*****************************
Title: Replica of Galileo's Telescope and the Ears of Saturn
Date Occurred: March 15, 2006
Date Written: March 15, 2006
Date Prepared for Web Site: April 26, 2019
Written by: Joel T. Kant
Copyright (c) 2019 by Joel T. Kant
*****************************
About a year ago, I built two replicas of one of the surviving telescope of Galileo Galilei. A letter writer to Sky & Telescope magazine had asked for the optical specifications of Galileo's telescope. He wanted to view the sky as Galileo had seen it. This caught my interest, especially after I looked over the specifications listed in the table in the magazine. (Reference: Sky & Telescope, “Hobby Q&A”, January 2005, reply by Roger W. Sinnott, p. 140.) I decided to build one of my own. This turned into making two of my own for reasons that I will explain.
I need to warn readers of that there are much better web sites and articles on making replicas of Galileo's telescope than anything I will type here! The best I found has various types of replica that were built with many demonstration photographs given. It is at
http://www.pacifier.com/~tpope/Building_A_Galilean_Telescope.htm
I have nothing to write as fancy, detailed, mathematical, or profound as on that web site. This is instead merely some lightweight playing around that I did for fun.
Both my replicas are optically identical. The objective lens is a Melles Griot part 01LPX345. That is a plano-convex lens with a focal length of 1,000 millimeters. Since 1,000 millimeters equals one meter, that means if during mid-day you wanted to focus the sun down to a bright dot on a sheet of paper to try to start it on fire, this lens would need to be held a meter away from the sheet. This also puts a rough length on the telescope itself of about a meter, so it gives an idea of the size of this replica.
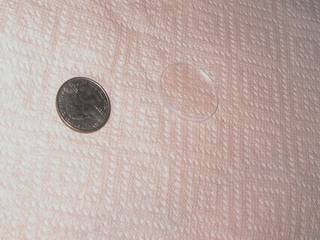
This same lens has a diameter of 30 millimeters, which is roughly an inch and an eighth. For an objective lens of a telescope, this is tiny! (See Fig. 1) This size determines how much light gets in. This is about the size opening of a very inexpensive pair of miniature binoculars that you can fold up and shove in a jacket pocket.
Figure One: A United States Quarter Next To Melles Griot 01LPX345 Lens
[Photograph by Joel Kant, Feb. 20, 2005]
On one of the surviving telescopes, Galileo then stopped his objective lens down even smaller to under an inch with cardboard with a hole in the center! After I mounted my lens, it has about 20 millimeters or so diameter opening. This is a little under an inch as well. I used rubber stoppers where I drilled out the center with a hole-cutting drill bit (See Fig. 2)
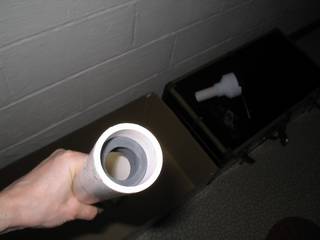
Figure Two: Rubber Stopper with Hole in PVC Pipe
[Photograph by Joel Kant, Feb. 20, 2005]
Although this small opening lets in little light compared to a larger apeture, there are advantages to having this small opening. For the hand-ground plain glass lenses of Galileo's time, the center portion of the lenses were often excellent, as good as typical inexpensive glass lenses of today, but the lenses of his time were of much poorer quality toward the edges. So, he was using only the high quality center portion of his lenses. Also, the lenses of his time as well as most inexpensive lenses of today are spherically ground. That is, the curve ground in has a constant radius. Ideally, a parabolic shape would be used, and that can be found today by spending sufficiently large amounts of money. Most reasonably priced lenses even today are spherically ground. The spherical curve leads to an optical defect called spherical aberration. It is unavoidable for this type of lens shape. The longer the focal length and the smaller the clear aperture that lets in light, the less of an effect the spherical aberration will have.
Most objective lenses in modern refractor telescopes are called either achromatic or apochromatic. Apochromatic is better and considerably more expensive than achromatic, but both are a big improvement over plain glass lenses. The term “chromatic” simply refers to colors of light. What is done is a lens is made of different types of glass with different indices of refraction bonded or placed together. By careful choice of types of glass and of lens design, the chromatic aberration effect can be lessened considerably. With apochromatic telescopes, it is practically nonexistent!
The core issue involves the same effect of how a glass prism can break white light into a rainbow of colors. This same effect, to a lesser degree, happens in a plain glass lens. Light is going through glass and being bent, after all, and not all wavelengths of light (i.e., colors) will bend the exactly the same angle.
Galileo only had available plain glass lenses, of course. The glass of his time had optical properties according to the two sources I gave above that are not that different from inexpensive and very common BK7 glass of today. My 01LPX345 lens is make of BK7 glass.
(Reference: http://www.pacifier.com/~tpope/Building_A_Galilean_Telescope.htm)
(Reference: Sky & Telescope, “Hobby Q&A”, January 2005, reply by Roger W. Sinnott, p. 140.)
For chromatic aberration, using a long focal length and a small clear aperture will reduce it even for plain glass lenses.
Having only one lens provides merely a magnifying glass. At least two lenses are needed to make a telescope. Galileo’s design is very interesting in that he used a concave lens for his second lens, the eyepiece.
For my eyepiece lens, I have a Melles Griot part 01LPK011. It is a concave-concave lens with focal length of -38.1 mm. That is a negative number because rather than bringing light together to a point like a convex lens does, this type of lens immediately spreads light apart. The focal length tells how quickly it will be spread.
As with my other lens, this is also made of BK7 glass. The physical radius is slightly smaller at 25.4 mm. By definition, 25.4 mm equals exactly one inch, so it is a size common and inexpensive. Low cost was important to me in a hobby project like this!
Other than very inexpensive and low magnification binoculars known as opera glasses, very few telescopes or binoculars today use a design like this. The Galilean telescope design has two lenses, one convex with a long focal length and one concave with a short negative focal length. A problem with this design is it provides a very narrow field of view. An advantage of it is it provides an image where up is up, right is right, left is left, and down is down.
If one uses a convex lens for the eyepiece instead of a concave lens, one still gets a magnified image. The field of view even at the very same magnification is much greater for a design using two convex lenses. Looking down a Galilean telescope is like looking down a long narrow tube while the Keplerian design is more like a wide short tube in comparison, even if the physical tube lengths and diameters are about the same size. This is so even though the image for both can be equally magnified! A disadvantage of the convex lens at the eyepiece is that it inverts the image so up-is-down.
Putting a 90-degree flat mirror in place at the end just before the eyepiece lens will change the image so up-is-up again, but then right is switched with left. Most refractor telescopes today are built with a 90-degree flat mirror. From an ergonomic sense, that 90-degree flat mirror has benefits when looking at stars up in the sky. These refractor telescopes with a 90-degree flat mirror before the eyepiece flip the image left-to-right, but up-is-up. A refractor telescope is one made primarily with lenses rather than curved mirrors to do the magnification. In contrast to magnifying with a glass lens, a curved mirror has no chromatic aberration at all! Isaac Newton came up with a reflecting telescope design that took advantage of this, but reflecting telescopes like that are not important for what I am writing about here.
Rather than a 90-degree flat mirror, a 45-degree prism can be used in a refractor telescope to create an image where up-is-up and right-is-right. There is some penalty of light loss in doing that. Most small telescopes known as spotting scopes use this method, while most astronomical refracting telescopes do not and flip the image left-to-right.
Most binoculars use a prism of some sort to put the image back so up-is-up and right-is-right.
Most modern telescopes use eyepieces with multiple lenses in them, and with the glasses for these of different types as well. This is for improving the image.
A Galilean telescope is a mere two lenses system with the objective lens (the far end) being convex with a long focal length and with the eyepiece lens (what the user looks through) being concave with a short negative focal length.
I read on Tom Pope's web site that the eyepiece on the telescope that I was using the specifications for from the Sky & Telescope table is not original!
(Reference: http://www.pacifier.com/~tpope/Building_A_Galilean_Telescope.htm)
(Reference: Sky & Telescope, “Hobby Q&A”, January 2005, reply by Roger W. Sinnott, p. 140.)
However, it seems likely to be fairly close to the optical properties of the now-missing original based on the amount of magnification Galileo must have used to see what he saw and by comparison of the design to the other surviving telescope.
Today, there are two surviving telescopes attributed to Galileo and then one large objective lenses on its own without a telescope or eyepiece to go with it.
Practically any good telescope or binoculars today will have in the sales literature or box comments bragging about the multi-coated lenses. These coatings increase light transmission and reduce reflections. If you look sideways at the big lens side of a typical pair of binoculars, they will generally appear orangish-red or bluish-purple. That comes from the coatings, with it being a different type of coating for the color difference. These coatings were certainly not available in Galileo’s era! The two lenses I bought have no coatings. It would likely improve the image I saw if they had coatings, but it would also defeat the point of looking at the sky the way Galileo had.
To be blunt, you can buy for well under a hundred dollars at most big department store like Sears, WalMart, K-Mart, or even Toys-R-Us a telescope that will give a much better image and much more meaningful magnification than a replica of Galileo’s telescope!
My first attempt at a replica of Galileo’s telescope involved using PVC pipe for the tubes. I had a smaller diameter pipe that slid inside a larger diameter pipe. I added a little friction tape so the tubes would not slide too easily. If you think of a pirate movie where a telescope is focused by sliding the smaller diameter tube in or out from the larger diameter tube, it is like that.
This simple method is how the focus works on the two surviving telescopes attributed to Galileo.
I tried my telescope out in the daytime on light poles, chimneys, and TV antennas. The result was highly disappointing! I realized one big problem was internal glare. The insides of the PVC tubes were white and shiny. Recall also these are uncoated lenses, so inclined to more internal reflections than coated lenses.
I tried spraypainting the insides of the tubes flat black. That helped, but not as much as I had expected. Even painted flat black, the sides seemed shiny and reflected much light.
For cosmetic reasons, I had bought textured paint to use on the outside of the tube. The surviving telescope that I was using as a model has reddish-brown leather on the outside. This spray paint from an art store is supposed to give a reddish-brown leather-like texture to whatever it is painted on. I noticed when I painted the outside of the tube with it that ever though it had the reddish-brown color, the surface seemed more flat and less reflective than the flat black but smooth paint I had used on the interior.
I resorted to spraying the inside as well as the outside of the PVC tubes with that textured paint.
That made a considerable improvement. What Galileo had was raw wood or cardboard on the interior of his telescope. I think the wood should have some texture to it, and I found texture surprisingly important on cutting down internal light reflections.
(Reference: Pettit, Edison, “A Telescope of Galileo,” Publications of the Astronomical Society of the Pacific, Vol. 51, No. 301, June, 1939, pp. 147-150, which is available for free download from the Smithsonian/NASA ADS web site
http://adsabs.harvard.edu/cgi-bin/nph-bib_query?1939PASP...51..147P
I got to this pdf file at Smithsonian/NASA ADS by using a link from Tom Pope’s web site
http://www.pacifier.com/~tpope/Additional_Info.htm#Pettit_1939)
Tom Pope's web site suggests using light baffles inside the tube to cut down on reflections. (Referenence: http://www.pacifier.com/~tpope/Building_A_Galilean_Telescope.htm) That would probably work much better than what I did, but that method had not been discovered in Galileo's time. It involves putting rings inside the tube to help break up the reflections. There are formulas to optimize how many and where to place the baffles, but even just throwing in a few wherever one chooses is likely to cause a major improvement compared to having none. Yet, for a more authentic viewing experience, I have none.
Depending on the angle of the sun during the day, I can still sometimes get some annoying internal reflections even after using the texture paint inside the tube, but mostly the telescope now works fairly well on targets like chimneys and TV antennas.
I then went out at night and tested it on the stars and planets. I could hardly ever get it pointed at what I wanted to see! Certainly, I could sometimes manage it. However, the field of field was so narrow that it was easy to lose from view what I wanted to see to a slight touch of the telescope or even if a gust of wind moved the telescope slightly.
Trying to aim was like trying to aim a gun without any sights. The only method is to sight along the rounded top of the tube, which was hard to see at night since I had painted it a flat, dark color. (See Fig. 3)
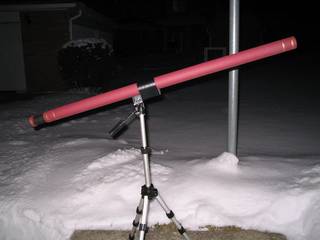
Figure Three: Replica of Galileo's Telescope With Tube-in-Tube Focusing
[Photograph by Joel Kant, March 3, 2005]
I left that scope alone. I still have it. I decided to try again, cheating this time! Not in terms of the type of view through the eyepiece, though. I bought a second set of identical lenses from Melles Griot.
By way, for my second order, the representative of the company did not seem quite so pleased with such a small order. There might be minimum orders required now. Beware of that if one tries to duplicate this experiment with the same lenses.
I again used PVC pipe, painted with the same textured paint. I glued about a two-inch-long piece of pipe at the front end and another two-inch-long near the eyepiece end. I left the edges facing the eye raw PVC white. That I could see in the semi-dark in my backyard and get fairly close aim. Better than sighting along the rounded top of a dark tube, anyway.
Since I was cheating this way in my aiming, I decided to cheat some more. I bought a small BB gun sight for about six dollars from Wal*Mart. It magnifies only about 4 times. I mounted that on the side as a finder scope. I ripped apart some ten dollar binoculars to make yet a second finder scope. I also put on a film canister to use as a sun guide when looking for sun spots, but I will not talk about that in this writing. (See Fig. 4)
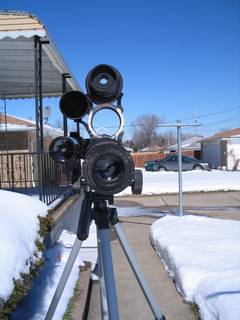
Figure Four: Eyepiece End of Second Galileo Replica with Finderscopes and Rack-and-Pinion Focuser
[Photograph by Joel Kant, March 5, 2005]
My first version of the replica of Galileo's telescope had frustrated me because when I tried to focus moving the tube in the tube, I almost always lost my direction of pointing. I decided to cheat with this as well. From an eight dollar toy telescope, I ripped that apart and took the rack-and-pinion focus end from it. It had light baffles in it that I cut out entirely, leaving it just an open tube. I also cut off the 90-degree mirror.
The main telescope is still the simple two lenses design, with the 1,000 mm focal length convex lens as the objective and an -38.1 concave lens as an eyepiece. These cheats are instead just for aiming and for changing the focus.
I also got a beefier tripod. I had been using a camera tripod. I got one designed for heavier videocameras. A stronger and heavier tripod made a tremendous difference.
I have been happy with this setup, even though I am obviously cheating in how I get the telescope aimed at objects and with that rack-and-pinion focuser. It is much less frustrating to use this version of the telescope. (See Fig. 5) The image through the eyepiece is the same as the replica that I made with the tube-in-a-tube design without any sights or finder scope.
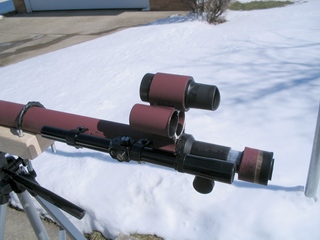
Figure Five: Second Replica of Galileo's Telescope With Finderscope and Rack-and-Pinion Focuser
[Photograph by Joel Kant, March 5, 2005]
There were two simple tasks that I wanted most to try with the Galilean telescope. The first was to look at Venus to see the crescent shape. I did that some time ago and already wrote about it on my web site. This telescope worked well and easily for that task. The crescent shape of Venus was blatant and obvious through it!
The second was to look at Saturn and its rings. It seems Galileo never figured out Saturn had rings, but could see something was very strange about it. I believe he referred to Saturn as having ears. (Reference: Dava Sobel, The Planets, Viking, Published by the Penguin Group, (c) 2005, Penguin Group (USA) Inc., 375 Hudson Street, New York, New York 10014, USA, p. 168.)
I have played with this several times over the past year when Saturn was out. Today, I decided to make some crude sketches while at the eyepiece. None of my attempts to shoot a picture through the eyepiece has been successful.
I made a sketch of what I saw through the replica of Galileo’s telescope that has the cheats of the finderscope and rack-and-pinion focuser. (See Fig. 6) This was at 8:40 p.m. on Wednesday, March 15, 2006. The seeing conditions seemed mediocre with noticeable twinkling of stars. It was about what I saw in previous attempts. I could not tell Saturn had rings, but there was certainly an oval shape. The image changed slightly as I watched, perhaps from air turbulence. Sometimes, I saw just an oval, but others I saw a circle merged with an oval. For what I saw, a comparison with the shape of ears fits very well! I would also say the shape I saw was sort of like the typical sketch of a 1950's era flying saucer.
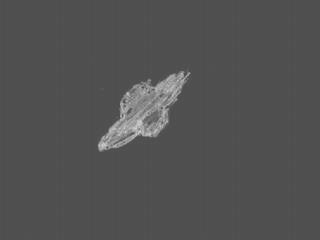
Figure Six: Saturn Looking Like Oval Merged With a Circle
[Pencil sketch by Joel Kant, March 15, 2006, with ACDSee digital image negative effect used to change black-to-white]
The magnification was about 1,000 divided by 38.1, so 26 times. The aperture is roughly 20 mm because of how I mounted the objective lens.
In even a modest and inexpensive modern telescope, it is easy to see the rings of Saturn. For a comparison tonight, I pulled out my Meade 60 mm Compact Refractor mounted on a camera tripod. I got mine at a discontinued sale for thirty-two dollars, then regularly use eyepieces that cost forty dollars rather than what came with it! This is what many people would call a spotting scope because it has a 45 degree prism so gives an up-is-up, right-is-right image. It has a 60 mm aperture with a 350 mm focal length. I used a Meade plossl eyepiece of 5 mm focal length. That should give a magnification of 350 divided by 5 equals 70 times.
I made a sketch of what I saw through this Meade telescope. (See Fig. 7) This was at 8:46 p.m. on Wednesday, March 15, 2006. In other words, mere minutes after looking through and sketching what I saw in the Galilean replica telescope. Although the seeing conditions seemed mediocre with noticeable twinkling of stars, the rings of Saturn were unmistakable as rings in this telescope!
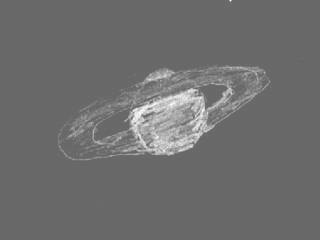
Figure Seven: The Rings of Saturn as Rings
[Pencil sketch by Joel Kant, March 15, 2006, with ACDSee digital image negative effect used to change black-to-white]
I have another Meade that has a larger aperture of 80 mm and longer focal length of 900 mm than my other Meade telescope. This is a Meade DS-80AT with Autostar computer. Views through it generally are considerably better than in the Meade 60 mm Compact Refractor, but I did not pull that out tonight. It is large and also Saturn was high enough tonight that although I could aim at it with the telescopes on the videocamera and camera tripods, I think I would have had trouble with this scope with its own tripod. The computer with the motor control wisely tries to prevent ramming the optical tube into that tripod when aiming too high.
Therefore, tonight I just had both the Meade 60 mm Compact Refractor and the Galilean Replica (with cheats of focuser and finder scope) set up outside the back door. I took this picture at a little after nine p.m. (See Fig 8) The moon had climbed up above the horizon by then and can be seen behind the telescopes. The moon was considerably lower a mere half-hour earlier.

Figure Eight: Two Telescopes Outside Back Door
[Photograph by Joel Kant, March 15, 2006]
I did find an image of Saturn that I took with my larger Meade DS-80AT telescope back on April 14, 2005. (See Fig. 9) A free electronic eyepiece was included with the telescope, which puts a low resolution black-and-white picture on the screen of a television set. Rather than using special equipment to capture the television image to the computer, I merely used a digital camera to take a photograph of the television screen! The rings of Saturn look much better by eye through the eyepiece than this photograph would suggest. However, even with this rather pathetic method of taking a photograph of a television screen, it is obvious that Saturn has a large ring around it.
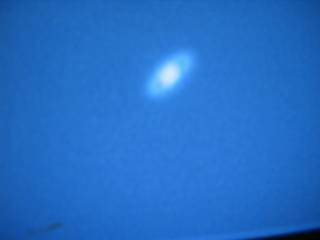
Figure Nine: Saturn Displayed on Television Screen on April 14, 2005
[Photograph by Joel Kant, April 14, 2005]
Despite what my modern telescopes show, for my replica of Galileo’s telescope, what I see at the eyepiece does not make it obvious that Saturn has a ring around it. Nevertheless, Saturn through the eyepiece of the replica of Galileo's telescope is definitely not just a circle!
REFERENCES
http://www.pacifier.com/~tpope/Building_A_Galilean_Telescope.htm
Sky & Telescope, “Hobby Q&A”, January 2005, reply by Roger W. Sinnott, p. 140.
Pettit, Edison, “A Telescope of Galileo,” Publications of the Astronomical Society of the Pacific, Vol. 51, No. 301, June, 1939, pp. 147-150, which is available for free download from the Smithsonian/NASA ADS web site
http://adsabs.harvard.edu/cgi-bin/nph-bib_query?1939PASP...51..147P
I got to this pdf file at Smithsonian/NASA ADS by using a link from Tom Pope’s web site
http://www.pacifier.com/~tpope/Additional_Info.htm#Pettit_1939
Dava Sobel, The Planets, Viking, Published by the Penguin Group, (c) 2005, Penguin Group (USA) Inc., 375 Hudson Street, New York, New York 10014, USA, p. 168.
THE END
Back to Joel Kant Home Page: Joel Kant Home Page.